Table of Contents
Introduction
A common way of controlling home appliances is the mechanical switches, where the person needs to press the switch to turn ON or turn OFF. But, now we are in the phase of automation and work wirelessly over a distance. So, now no need to use the same boring mechanical switches to control home appliances.
This article describes a mobile application running on an Android device, connected to an HC05 Bluetooth module. The module links to a Raspberry Pi Pico board, along with a control circuit and relay driver, which controls the ON and OFF functions of various devices.
So, in our previous tutorial, we built a Bluetooth Controlled Home Automation and in this tutorial, we will extend the limits of controlling. So, here we will introduce voice as a command to control the devices. This project is similar to our Bluetooth Controlled Home Automation tutorial, you can follow whichever you like.
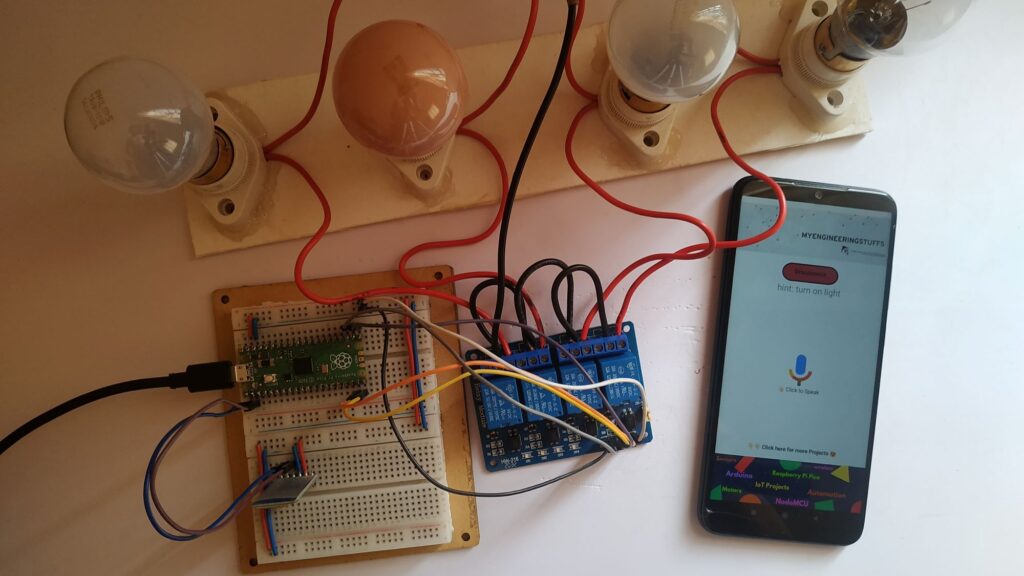
Here, we will make a home automation project again using a Raspberry Pi Pico board, HC05 Bluetooth module, 5v relay driver, etc. Home automation means we need to control the ON/OFF sequence over a wireless communication protocol but with voice commands. Here we will use the HC05 Bluetooth module for wireless communication. To complete the project we will use an Android application as to control all the appliances.
For this project I have designed an Android application and you can download it in the download section. And to learn application building you can follow the complete guide on my YouTube channel. If you want to design your own mobile application you can follow this video tutorial.
We will use MicroPython to complete this project, MicroPython is the light version of Python which can run on low memory devices. So, let’s start building projects using Raspberry Pi Pico and provide faster execution of statements.
Hardware Requirements
Disclaimer: It may contains Amazon affiliate links. which means I can get a small commission on the sale. This might be your indirect help to me. Thank You 🙏- Raspberry Pi Pico (HERE)
- Micro USB Cable (HERE)
- 4-Channel Relay Driver (HERE)
- HC05 Bluetooth Module (HERE)
- Connecting Wires (HERE)
- Breadboard (HERE)
- AC bulb holder
- AC bulb
- Connecting wire for AC lines
Software Requirements
About HC05 Bluetooth Module
HC05 is a popular Bluetooth module that enables wireless communication between electronic devices. It is a small and inexpensive module that uses Bluetooth 2.0 technology to establish a serial communication with a device, like a microcontroller or computer, and a remote device, such as a smartphone or tablet.
The module has a range of up to 8-10 meters and can support data transfer rates of up to 2.1 Mbps. It can be operate in either master or slave mode, and it also supports multiple Bluetooth profiles including the Serial Port Profile (SPP), which allows for easy integration with a wide range of microcontrollers and other electronic devices.
You can easily interface the module with a microcontroller using serial communication. A few basic AT commands allow you to configure settings such as the module mode, baud rate, and device name.
Overall, the HC05 Bluetooth module is a popular choice for adding wireless communication capabilities to electronic devices due to its low cost, ease of use, and wide availability.
About 5v Relay

A 5V mechanical switching relay is an electromechanical device that allows you to switch on/off electrical circuits using a low-voltage control signal.
The relay consists of a coil, a set of contacts, and a switch operated by the electromagnetic force generated by the coil. When you provide the proper voltage at the coil terminal, the contact connected to the NC (normally closed) point shifts to the NO (normally open) point, completing the circuit. This mechanical switching occurs using a digital signal through an optocoupler in the 5V relay module.
Circuit Diagram
Circuit Explanation
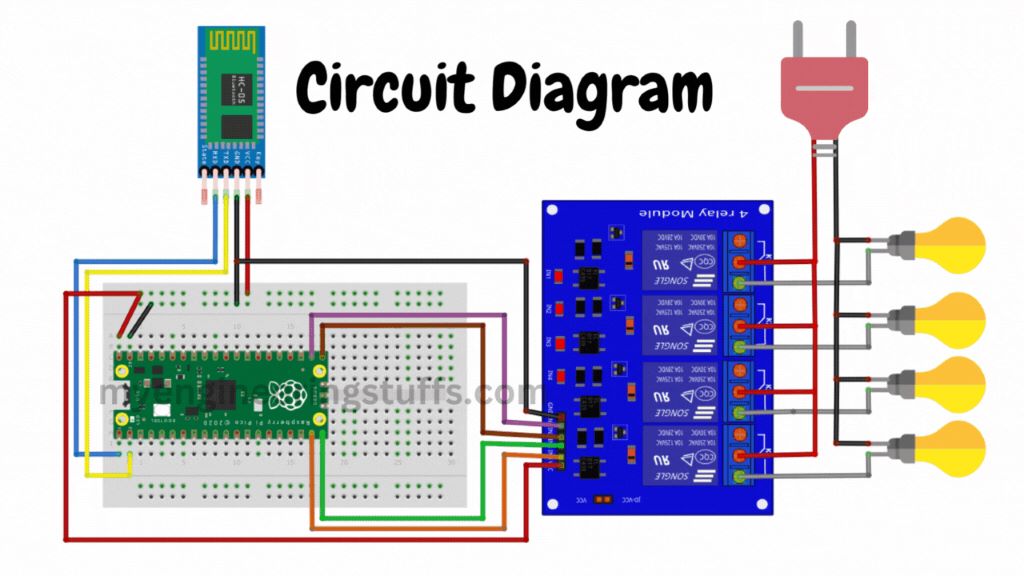
Follow the circuit diagram and build your circuit correctly.
HC-05: The important pins of Bluetooth module and the connection explained below.
| HC-05 Bluetooth | Raspberry Pi Pico |
| VCC | Common 5v |
| GND | Common GND |
| Tx | GP1 |
| Rx | GP0 |
Relay Driver: The relay driver I am using is a 5v 4-channel relay, this means I can control up to 4 devices. The circuit diagram is explained in the below table.
| Relay Driver | Raspberry Pi Pico |
| VCC | Common 5v |
| GND | Common GND |
| IN1 | GP17 |
| IN2 | GP16 |
| IN4 | GP15 |
| IN4 | GP14 |
AC Connection: One terminal of AC wire is common to all the appliances, you can see the circuit diagram, the BLACK wire is common to all the AC loads and other terminal is connected to the COMMON point of relay. Now, look at the load side the load has two terminal, the one in BLACK color is the common connection and the other terminal of load is connected to the Normally Open Terminal of relay.
Source Code Explanation
MicroPython Code: The code we are using here is written in MicroPython programming language.
Main Code: (main.py)
So, this is the final code that is responsible for the receiving of data through the Bluetooth module and again compare the received data with the pre defined data and accordingly turning ON/OFF the devices connected to the relay. Now create one file in the Thonny IDE and copy/paste the code given in the download section as VoiceAutomation.txt and save it as a main.py file in the Raspberry Pi Pico board.
Why the main.py file name?
You can give any name to the file but when running the code from Thonny IDE by clicking the green button it will run once. But when we give the name main.py to the file, the Raspberry Pi Pico board will automatically detect and run the code whenever you want. You can say that this is a process of AutoStart the system.
Video Tutorial
Download Source Code
Download the complete source code: click here
1 thought on “Voice Controlled Home Automation using Raspberry Pi Pico”