Table of Contents
Introduction
As we know IOT plays a very important role in our upcoming style of living. We will control and monitor our garage door, garden watering, garden light system, feed our pet, etc… from a remote location miles away from the destination. In this case, the internet will be our connecting medium. So, by using the internet and giving connectivity of internet to our things we can monitor or can control them from anywhere in the world.
In this project, we will control the home appliances which are connected to the relay system using an android app and NodeMCU. So, we will follow the below steps to build our own Internet-based Home Automation.
This tutorial will only focus on the circuit diagram and code part. How to create a Google Firebase account and how to make an android app using MIT App Inventor2 you can follow the video link and create your own. Whereas every document you need will be attached in this tutorial so that you can download and use it as per your requirement. But please follow the video tutorial.
Setting Google Firebase Database in Google Firebase Console
Let’s start with STEP1:
- Google Firebase Console (Click HERE)
- Login using your Google account.
- Please follow the video tutorial to know how to create a project, and get the Firebase HOST and Firebase AUTH keys, which we will set in our program.
Develop Android App using MIT App Inventor
To develop an android app
- Go to MIT app inventor2 (Click HERE)
- Login using your Google account.
- Please follow the video tutorial to know how to create an android project and design your android app.
- Download the aia file of the android app for 4 channel relay which we are going to use in this tutorial HERE.
- Download the aia file of the android app for 8 channel relay( click HERE)
Set the Hardware and Program
Hardware Requirements
Disclaimer: It contains Amazon affiliate links. which means I can get a small commission on the sale. This might be your indirect help to me. Thank You 🙏Build your own 4 channels relay board
- 5v Relay – 4nos
- BC547 npn transistor – 4nos
- 1K resistor – 8nos
- 1N4007 diode – 4nos
- 3mm RED LED – 4nos
- 2-2 Terminal – 5nos
External Power supply
- Center tap 9-0-9 transformer
- 1N4007 diodes – 4 nos.
- 1000uF and 220uF capacitor 35v – 1no each
- 1K resistor – 2nos
- 5mm RED LED – 2nos
- 7805 and 1117 voltage regulators. – 1no each
Software Requirements
- Arduino IDE (You can download it from HERE).
- Arduino Firebase Library (Download it from HERE).
- ArduinoJson Library (Download it from the IDE steps given below)
- HOST and AUTH details from Google Firebase.
- Android app using MIT app inventor2 (Download aia file HERE).
In the new updates of the Firebase Arduino library, we need ArduinoJson Library too. To download the ArduinoJson library follow the steps.
- Open Arduino IDE
- Click Sketch — Click Include Library –– Click Manage Libraries and search ArduinoJson on the top search bar. Select version 5.13.5 otherwise it will give an error.

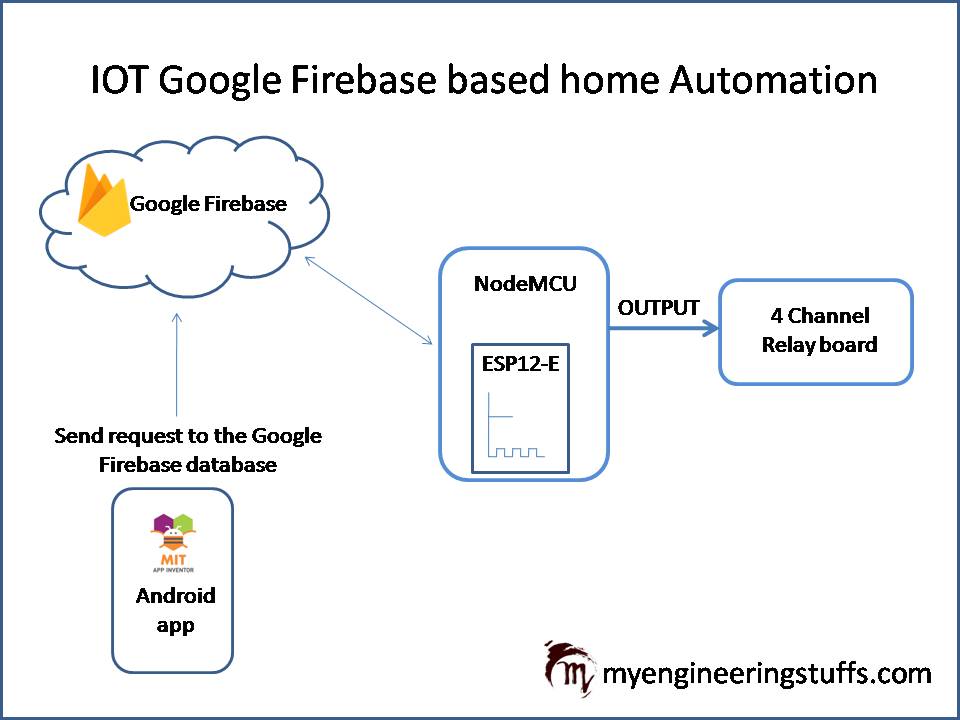
Block Diagram

Android app to Google Firebase: As you can see in the block diagram, the android app will make a request to Google Firebase and create a variable against the button which you have pressed and store its default value of 0. So, accordingly, if you pressed all four buttons for the first time you will create four variables FB1, FB2, FB3, and FB4 with initial values of 0.
NodeMCU to Google Firebase: Now NodeMCU will fetch the same variable data from the Google Firebase using the valid same HOST name and AUTH key. And accordingly, it will turn on the relay connected to the respective pins.
Circuit diagram
External Power Supply

Full Circuit Diagram
Follow the circuit diagram and build the connection correctly.

Video Tutorial
PART ONE and TWO
PART THREE
Download Source Code
Download the complete source code: click here
1 thought on “Home automation using Google firebase and NodeMCU”