Table of Contents
Introduction
NodeMCU is an open-source development board based on the ESP8266 microcontroller. NodeMCU is designed for IoT applications and is widely used for Wi-Fi-enabled projects.
The NodeMCU board includes the ESP8266 microcontroller, a built-in USB-to-Serial converter, and a voltage regulator. It also has a variety of digital and analog input/output pins, as well as built-in support for I2C and SPI communication.
One of the main advantages of the NodeMCU board is its built-in Wi-Fi capability, which allows it to connect to the internet and communicate with other devices. The ESP8266 microcontroller on the board includes a built-in Wi-Fi module, which means that you don’t need an additional Wi-Fi module to connect your project to the internet.
You can program the NodeMCU board using the Lua scripting language or the Arduino IDE. Many libraries and examples are available for the NodeMCU board, making it easy to start a wide range of projects.
Examples of Projects Using NodeMCU
- Home automation systems
- IoT devices
- Weather stations
- Smart home appliances
- Wireless sensor networks
- Web servers
- etc
It’s important to note that the NodeMCU board is available in different versions, each with its own set of features and capabilities. For example, there’s a NodeMCU v0.9, NodeMCU v1.0, NodeMCU v3, etc. They have slight differences in terms of pinout, storage, and communication interfaces.
Program NodeMCU using Arduino IDE?
Programming the NodeMCU board using the Arduino IDE. Please follow the below steps and building your projects.
- Install the Arduino IDE: If you haven’t already, download and install the latest version of the Arduino IDE from the Arduino website (https://www.arduino.cc/software/).
- Install the ESP8266 board package: The Arduino IDE does not include support for the ESP8266 microcontroller by default, so you will need to install the ESP8266 board package. Open the Arduino IDE and go to File > Preferences. In the Additional Boards Manager URLs field, enter “http://arduino.esp8266.com/stable/package_esp8266com_index.json” (without quotes) and click OK. Next, go to Tools > Board > Boards Manager and search for “esp8266”. Select the “esp8266 by ESP8266 Community” package and click Install.
- Select the NodeMCU board: Once the ESP8266 board package is installed, you can select the NodeMCU board from the Tools > Board menu. There may be different NodeMCU boards available, so make sure to select the one that corresponds to your board.
- Connect the NodeMCU board to your computer: Connect the NodeMCU board to your computer using a USB cable. The board should be recognized by your computer as a serial device.
- Select the correct serial port: Go to Tools > Port and select the serial port that corresponds to your NodeMCU board.
- Write and upload your code: You can now write and upload your code to the NodeMCU board using the Arduino IDE. You can write code using the Arduino programming language or using the Lua scripting language. You can also use available libraries and examples for the NodeMCU board.
- Verify and upload: Verify your code by clicking on the Verify button. After you have verified it, you can upload it to the NodeMCU by clicking the Upload button.
- Monitor the serial communication: The Arduino IDE includes a Serial Monitor that allows you to see any text or data sent from the NodeMCU to your computer. You can use it to debug your code or to interact with your NodeMCU board. You can open the Serial Monitor by going to Tools > Serial Monitor or by clicking the Serial Monitor icon in the top right corner of the IDE.
It’s important to note that this is a the overview of how to program the NodeMCU board using the Arduino IDE, each step may require additional details and explanations depending on your specific setup and requirements or depending upon the type of project. So, you can follow our NodeMCU category to find more projects and find the complete step by step guide.
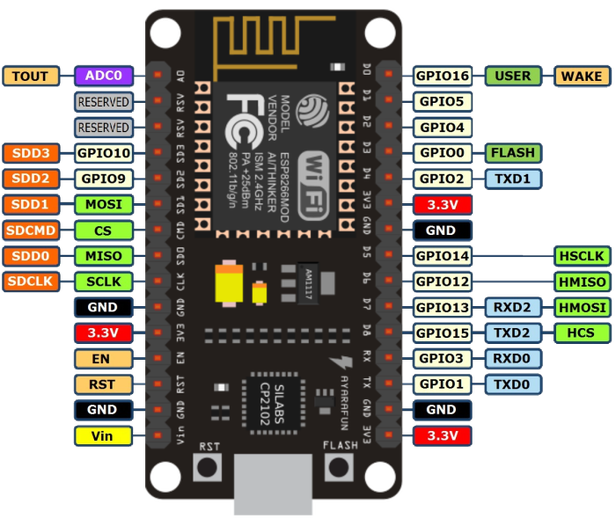
Pinout of NodeMCU