Table of Contents
Introduction
The Raspberry Pi Pico board is a big step to change is from the Raspberry Pi boards from the makers. Because now its no more a computer just like RPi2, RPi3, RPi3B+, RPi4, and etc. It is a low cost, high performance based microcontroller just like Arduino but with more power performance and more memory. It is based on 32bit Arm Cortex with M0+ RP2040 Microcontroller. With an 264KB of internal memory, supports 16MB of off-chip Flash. It has a wide range of flexible I/O pins. Which includes I2C, SPI, Digital programmable I/O pins(GPIO’s), ADC pins, and etc. It support endless feature with low cost, low consumption.
Further in our upcoming tutorials will show you how to interface analog sensor, digital sensor, wireless modules, GSM and WIFI modules for internet and for general purpose. This board can be programed using C/C++ or MicroPython. Using Arduino IDE we can write code for Raspberry Pi Pico board using C/C++ coding but here we are interested to write the code in MicroPython. MicroPython is the light version of Python which can run on low memory devices. So, lets start building projects using Raspberry Pi Pico and provide faster execution of statements.
Programming the Raspberry Pi Pico using Thonny is a simple process, here are the steps to follow:
Hardware Requirements
Software Requirement
- Thonny IDE (Download HERE)
How to Install Thonny
STEP1: Search on google

STEP2: Download the Thonny as per your system/laptop. Here I am downloading IDE for windows PC.

STEP3: After downloading, Install the application.


Now, accept the agreement and click on next.

Now, choose your location to install, or can leave it on the default location.

Now, click on NEXT and wait for the completion of the installation.


Write the code and test the Raspberry Pi Pico board
Now connect the Raspberry Pi Pico board to the computer and open Thonny IDE.

Now click on the Run menu and select the configure interpreter… tab

Now click on the first dropdown Which kind of interpreter should Thonny use for running your code? select MicroPython (RaspberryPi Pico) from the drop-down box and click on the second dropdown Port select the com port(mine is COM9 as shown), and click on OK to set the IDE.

Now write the LED blinking code or the code you are interested in and click on the save button, It will prompt you to save on your PC or on the Raspberry Pi Pico board. Just click Raspberry Pi Pico.

Now give an appropriate name to the file and click on OK to save the file on the raspberry pi pico board.

Now click on the green play button to start the code execution.

Video Tutorial
Download Source Code
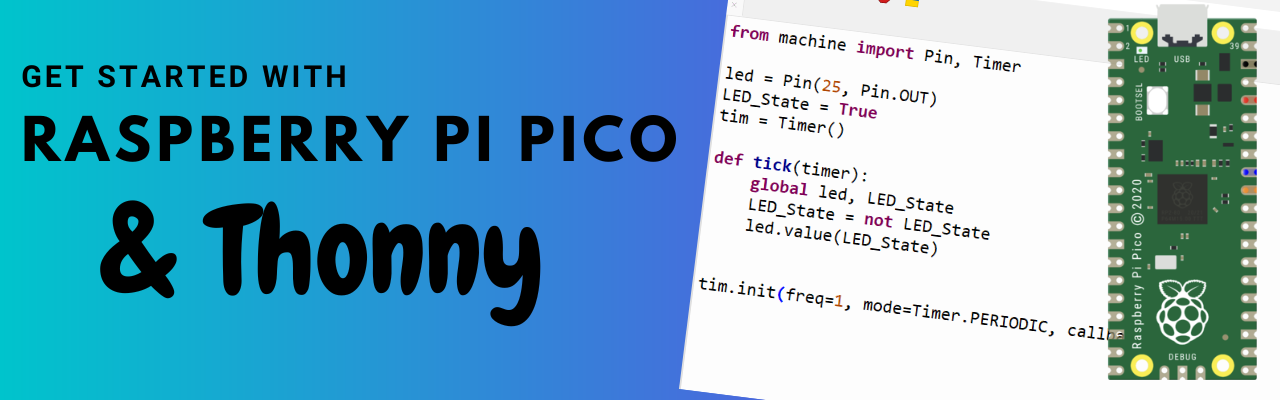
from machine import Pin, Timer

led = Pin(25, Pin.OUT)
LED_State = True
tim = Timer()

def tick(timer):
    global led, LED_State
    LED_State = not LED_State
    led.value(LED_State)

tim.init(freq=1, mode=Timer.PERIODIC, callback=tick)