Table of Contents
Introduction
The common way to advertise is to make banners, hoardings, paintings, etc. But now a day’s digital display is also getting popular to display advertisement, because of their durability and customization feature. So, in this tutorial, we will make a wireless noticeboard. Here we are using only one P10 display but you can build any size of the display for your advertisement board.
In one of our tutorials, we interfaced the P10 display with Arduino. You can follow this tutorial on how to interface with the P10 display. And jump into this tutorial to build your own Wireless advertisement board.
This is an electronic wireless display board. Using Arduino, HC-05, and P10/DMD Display.
About P10 Display
P10 is a 32×16 LED display with a total of 512 LED’s and the easiest display to interface with any of the microcontroller having SPI communication. This display is best for out door displaying. This display can be reconfigure to any size. This can be used a advertising boards in mall, railway stations, and in any public place.
P10 display pin descriptions:
- Pin1 (OE) – is the enable pin and it is used to control the brightness of the panel.
- Pin2 (A) and Pin3 (B) are the two selection line to select from multiple rows.
- Pin8 (CLK), Pin10 (SCLK), and Pin12 (DATA): are the control and data pins of the shift register.
- P10 display uses SPI communication to communicate with Arduino. So, in our code, we will use the SPI library.
Hardware Requirements
Disclaimer: It may contains Amazon affiliate links. which means I can get a small commission on the sale. This might be your indirect help to me. Thank You 🙏Software Requirements
- Arduino IDE (You can download it from HERE)
- DMD Library
- TimerOne Library
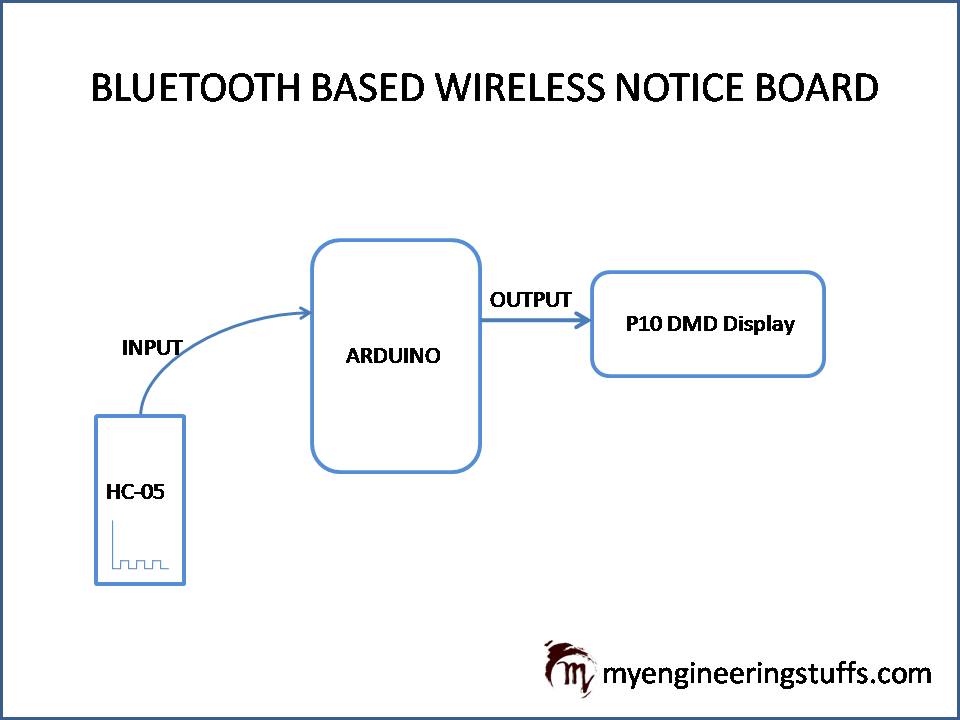
Block Diagram
Circuit Diagram
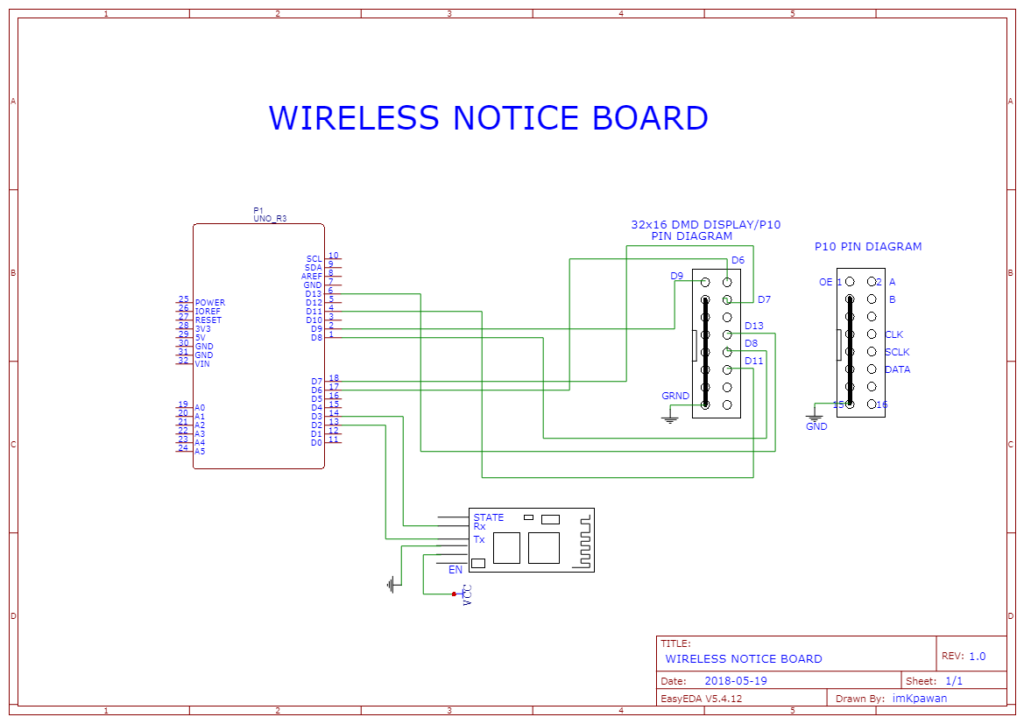
Circuit Explanation
P10 display connection with Arduino UNO
| P10 Display | Arduino UNO |
| PIN1 (OE) | D9 |
| PIN2 (A) and PIN3 (B) | D6 and D7 respectively |
| PIN8 (CLK) | D13 |
| PIN10 (SCLK) | D8 |
| PIN12 (DATA) | D11 |
HC-05 Bluetooth module with Arduino UNO
| HC-05 | Arduino UNO |
| Tx | Pin2 (Rx of software serial) |
| Rx | Pin3 (Tx of software serial) |
| VCC | 5v |
| GND | GND |
Video Tutorial
Download Source Code
Download the complete source code: click here